
Approval Config
1.Create Approval
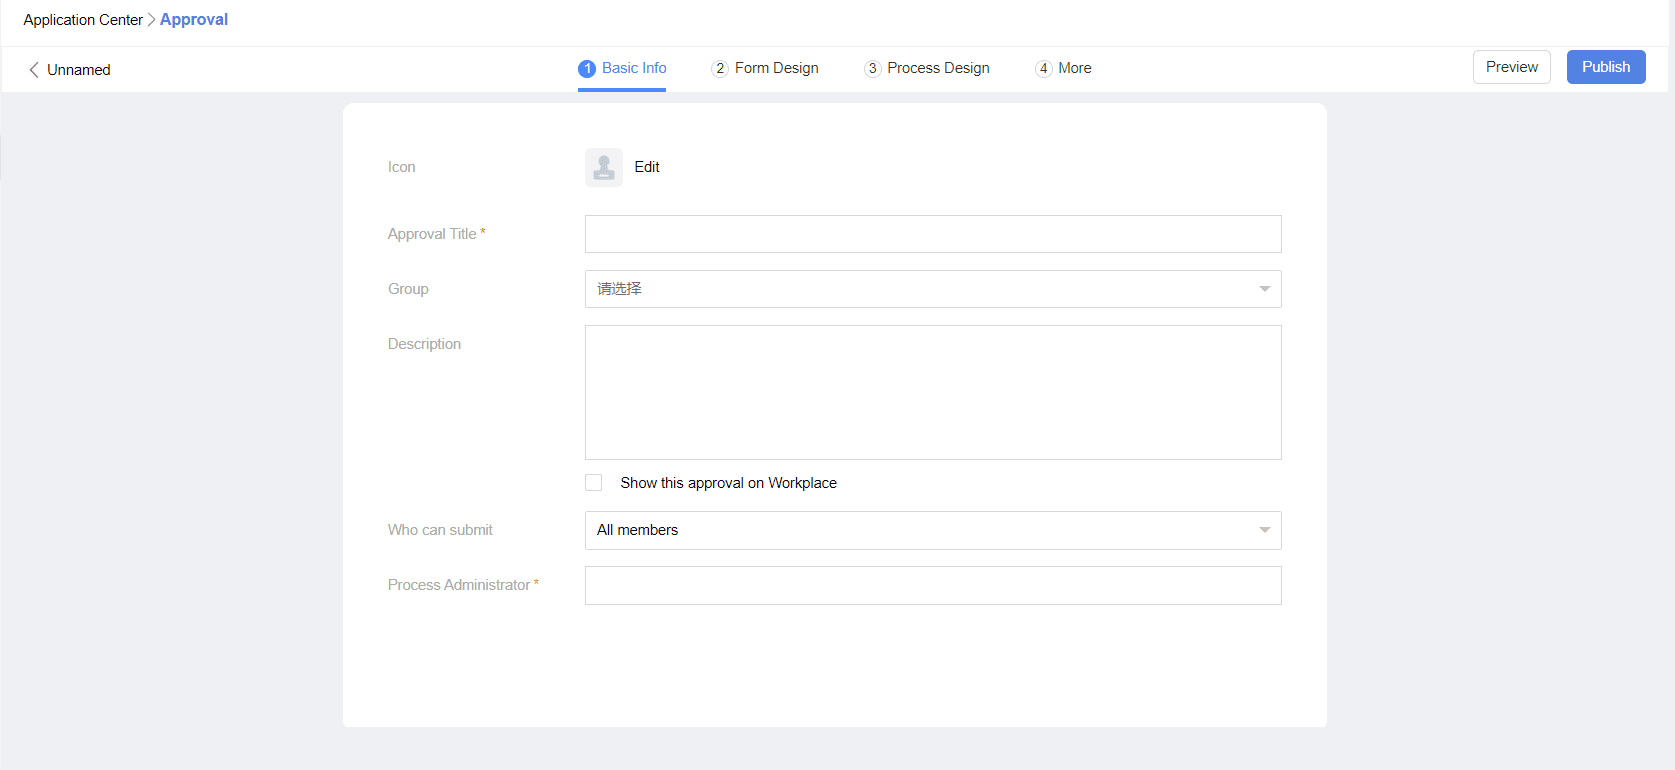
Path: Admin accesses 【Backend】 - 【Workbench】 - 【Approval】 - 【Form Management】 - 【Create New Form】 to directly create a blank form.
1.1 Basic Information
- Set Approval Icon: Required; use default icons or upload custom icons.
- Fill in Approval Name: Required;
- Set Form Group: Required;
- Fill in Form Description: Optional
- Display Approval on Workbench: Optional; if selected, must choose a non-group workbench. The approval form will then be directly displayed on the workbench.
- Set Initiator: Default is all members, can be customized to specific users.
- Set Process Admin: Required (when setting process nodes later, if the node responsible person is empty, the process admin can be designated to act on their behalf).
1.2 Form Design
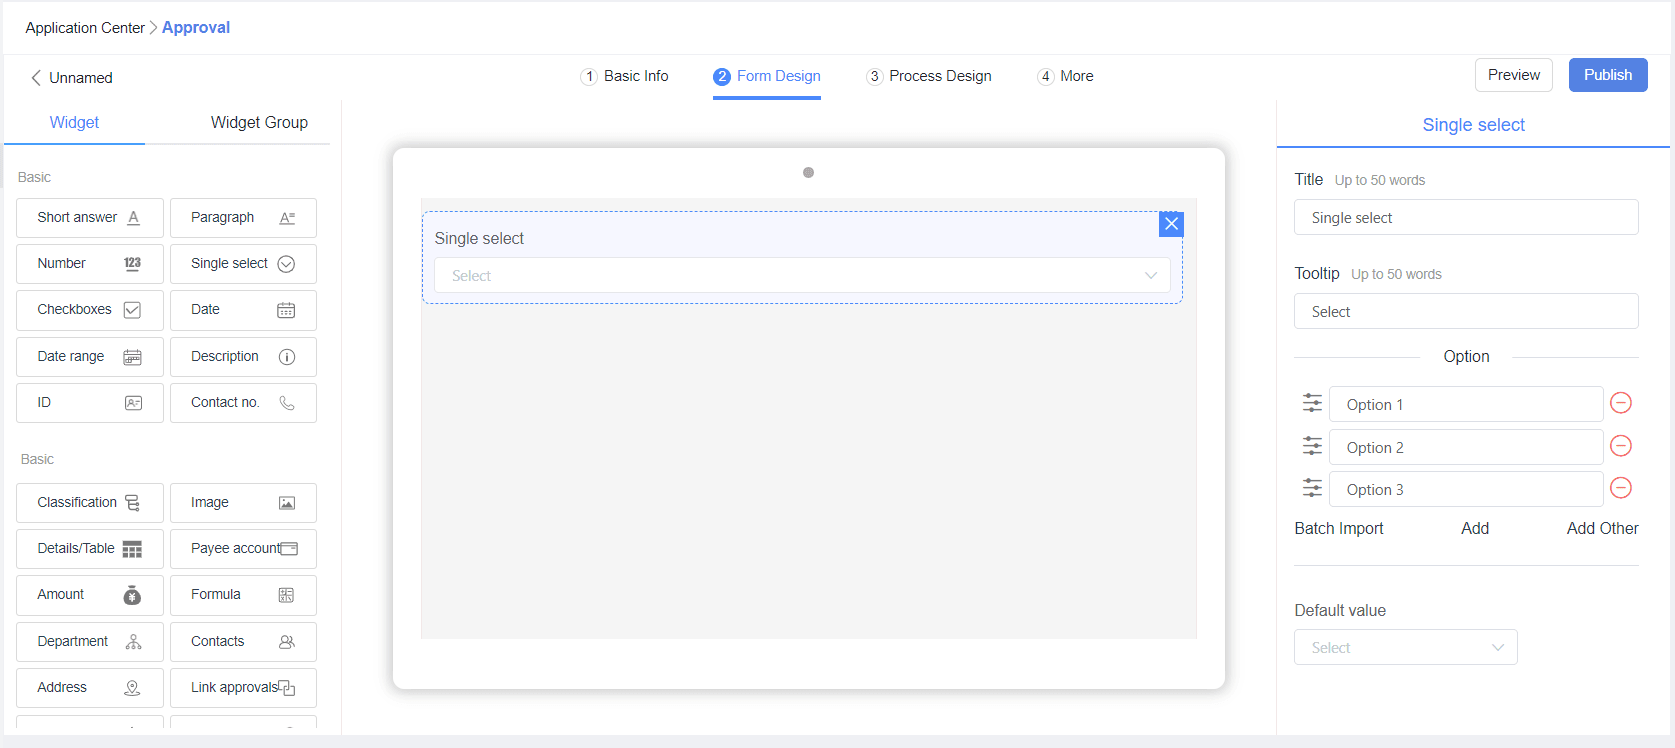
Form Control Description: Click or long-press controls to drag them to the middle view area, then click the added control to configure it.
Component Descriptions
- Single-line Text Box: Can set title, placeholder text, default value, and whether it's required.
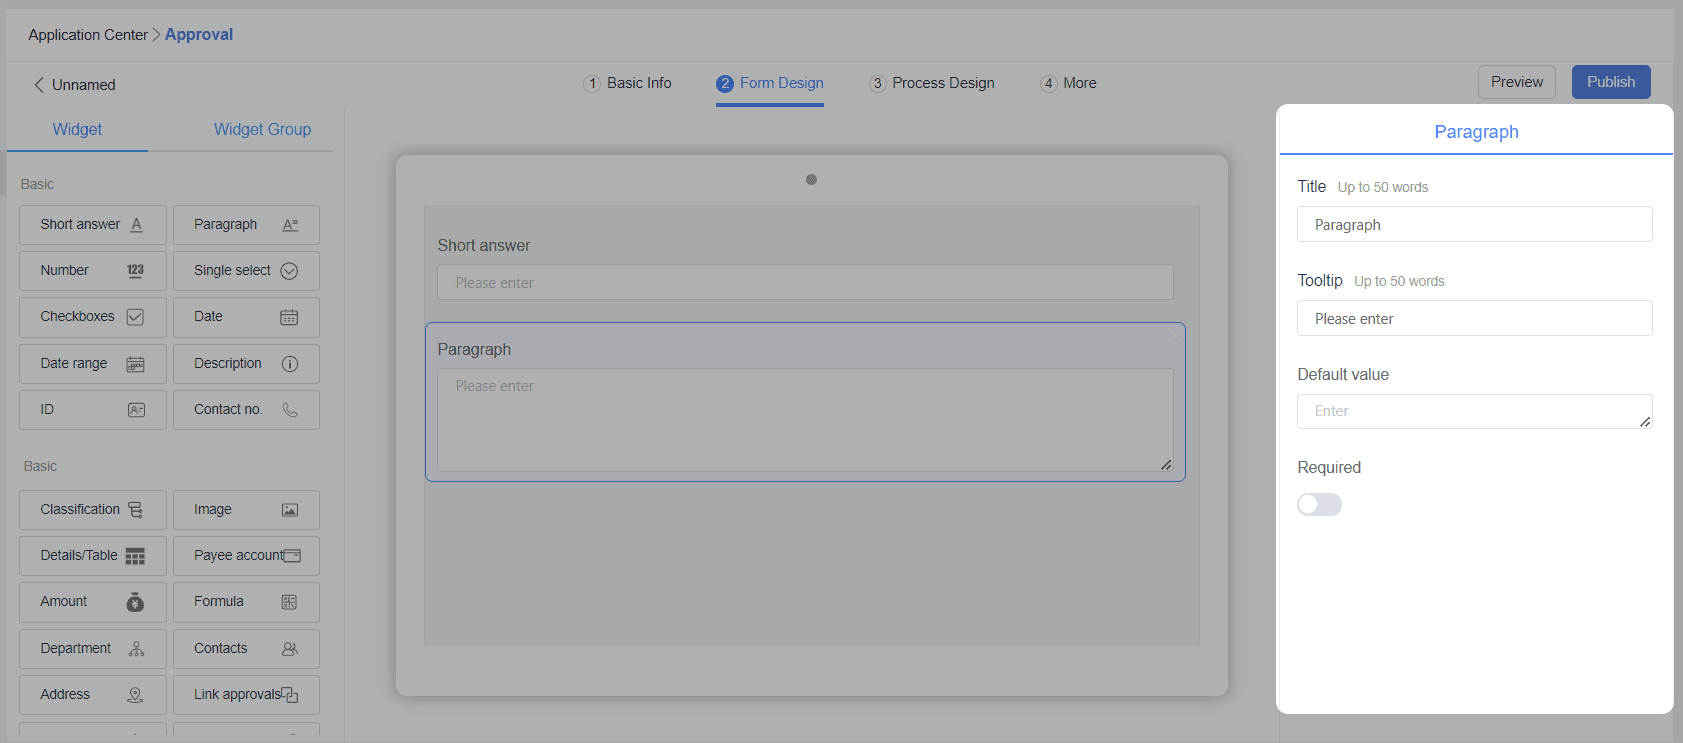
- Multi-line Text Box: Can set title, placeholder text, default value, and whether it's required.
- Number: Can set title, placeholder text, unit, decimal places, value range, and whether it's required.
- Radio Button: Can set title, placeholder text, custom options, default value, option layout, and whether it's required.
- Checkbox: Can set title, placeholder text, custom options, option layout, and whether it's required.
- Date: Can set title, placeholder text, date type, and whether it's required.
- Date Range: Can set start and end date titles, placeholder text, date type, and whether it's required.
- Explanatory Text: Set explanatory content, font color to red.
- ID Card: Can set title, placeholder text, and whether it's required.
- Phone: Can set title, placeholder text, phone type, and whether it's required.
- Cascading Categories: Can set title, placeholder text, custom category data, and whether it's required.
- Image: Can set title, number of images to upload, and whether it's required.
- Detail Table: Can set title; all controls except detail/table, payment account, and control groups can be dragged into it.
- Payment Account: Can set title, placeholder text, and whether it's required.
- Amount: Can set title, placeholder text, decimal places (up to 6 digits), value range, display amount in words, and whether it's required.
- Calculation Formula: Can set title, placeholder text, calculation formula (allows free setting of formulas for numbers, amounts, date ranges, and calculation formula controls), display decimal places, and display in words.
- Department: Can set title, placeholder text, single/multiple department selection, default value, and whether it's required.
- Contact: Can set title, placeholder text, select 1 person only/multiple selections allowed, default value, and whether it's required.
- Address: Can set title, placeholder text, type, whether to enable auto-location (APP can auto-locate and cannot modify the result; PC obtains IP address but allows modification of location result), and whether it's required.
- Related Approval Form: Can set title, set related approval forms that can be linked, and whether it's required.
- Rating: Can set title, rating scale, and whether it's required.
- Attachment: Can set title and whether it's required.
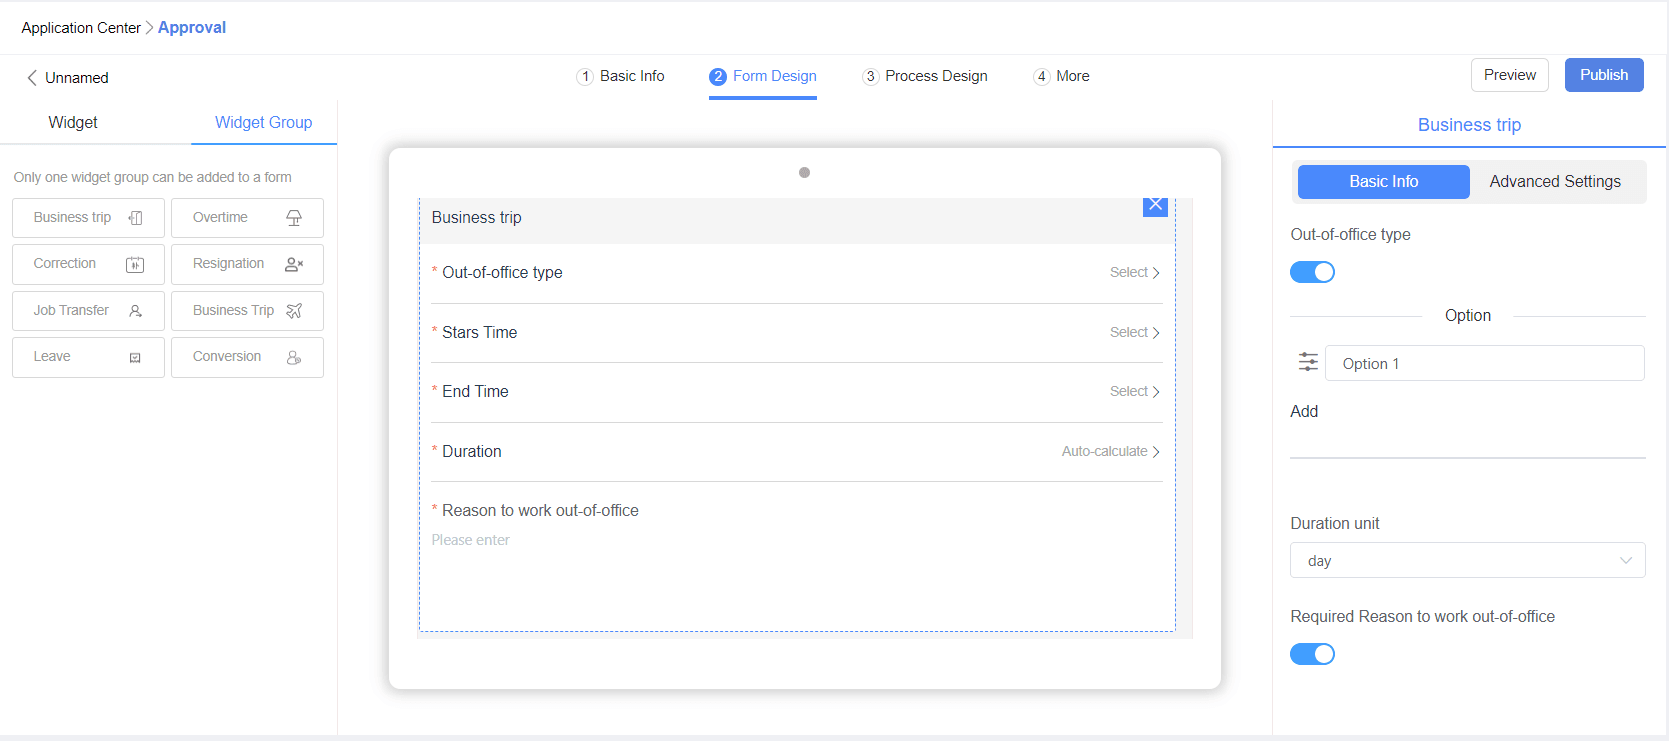
Component Group Descriptions
- Outing component: Can set whether to display outing types, enable to freely set outing options, can set the time unit for outing control (days, hours).
- Overtime component: Can set whether the overtime reason is required (this control group needs to be used with Attendance Punch-in - Overtime Rules).
- Card Replacement component: Can set whether the card replacement reason is required (this control group needs to be used with Attendance Punch-in - Attendance Group Settings - Card Replacement Rules).
- Business Trip : Can set the time unit for business trip control (half-day, day, hours).
- Leave : Can set whether the leave reason is required (this control group needs to be used with Attendance Punch-in - Leave Rules).
- Job Transfer : No configurable options.
- Probation Completion : No configurable options.
- Resignation : Can freely set resignation reasons.
If controls such as numbers, radio buttons, checkboxes, date ranges, amounts, and calculation formulas have been added before the current control in the sequence, you can configure whether to display the current control based on conditions.
Advanced Settings (Component Association)
If Components such as numbers, radio buttons, checkboxes, date ranges, amounts, and calculation formulas have been added before the current control in the sequence, you can configure whether to display the current control based on conditions.
1.3 Process Design
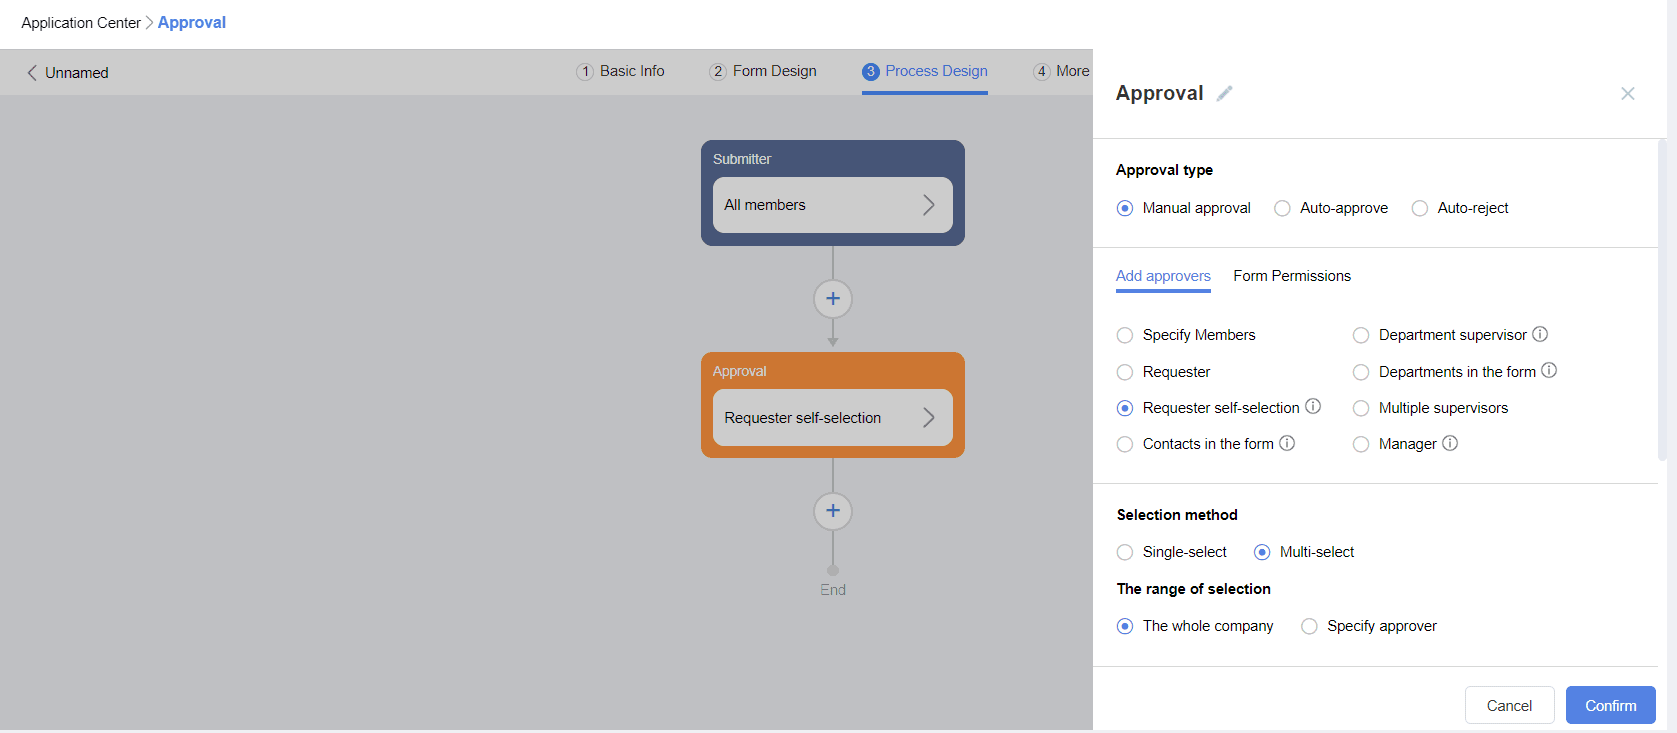
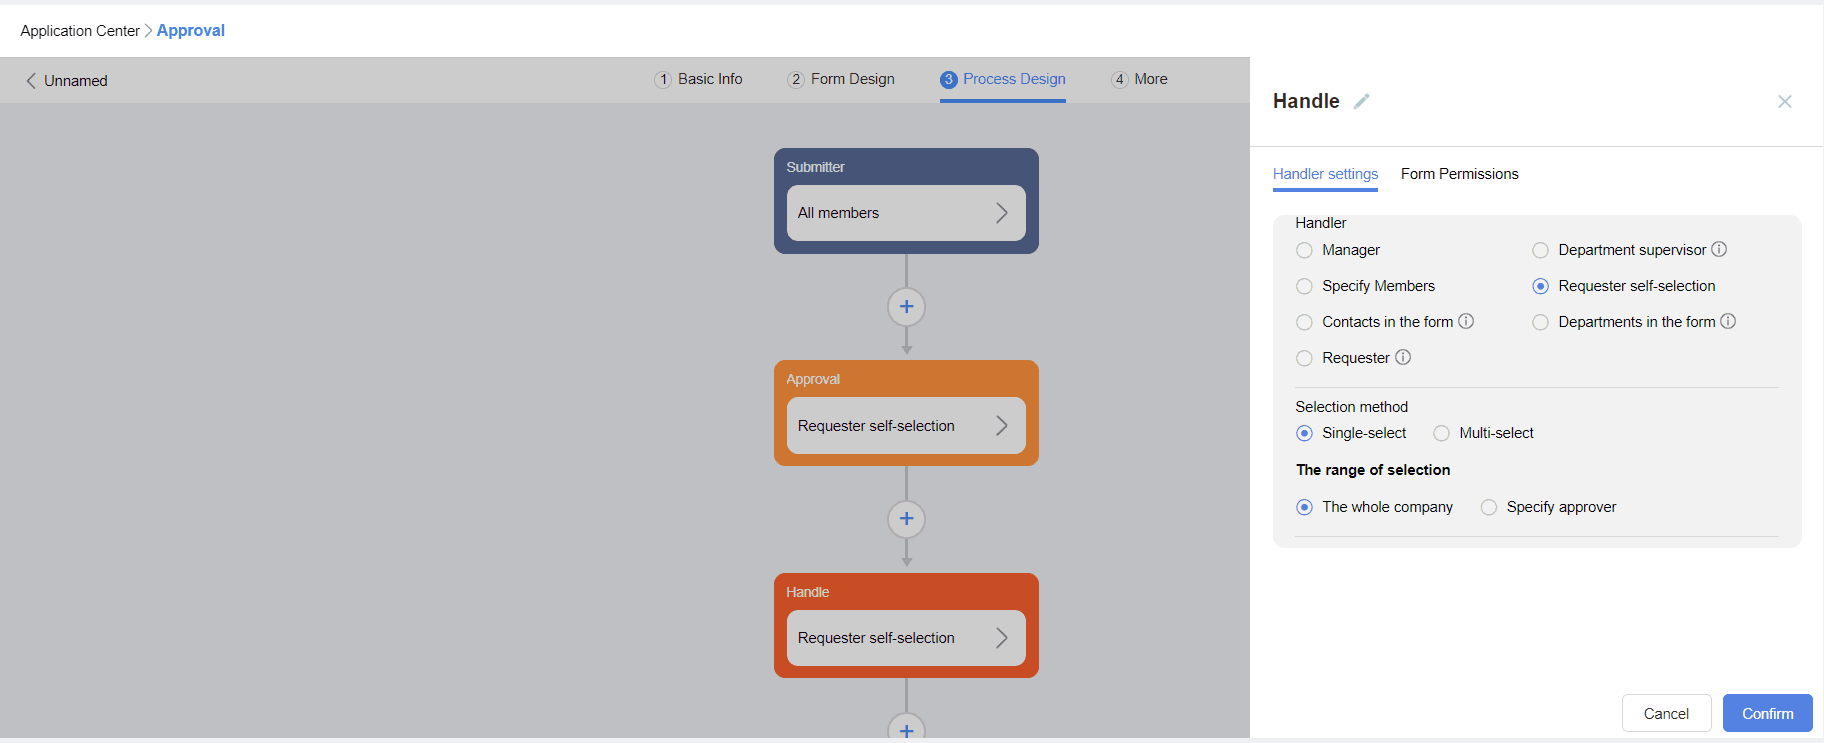
By default, one approval node is added (an approval form must have at least one approval node). Click 【Plus】 to customize and add condition nodes, approval nodes, CC nodes, and processing nodes.
Initiator Node
Basic Settings: Who can initiate: synchronously obtains data from Basic Settings - Who can initiate.
Form Permissions: Automatically acquires added forms; the form initiator can set editable, read-only, and hidden permissions for form controls.
Condition Branches
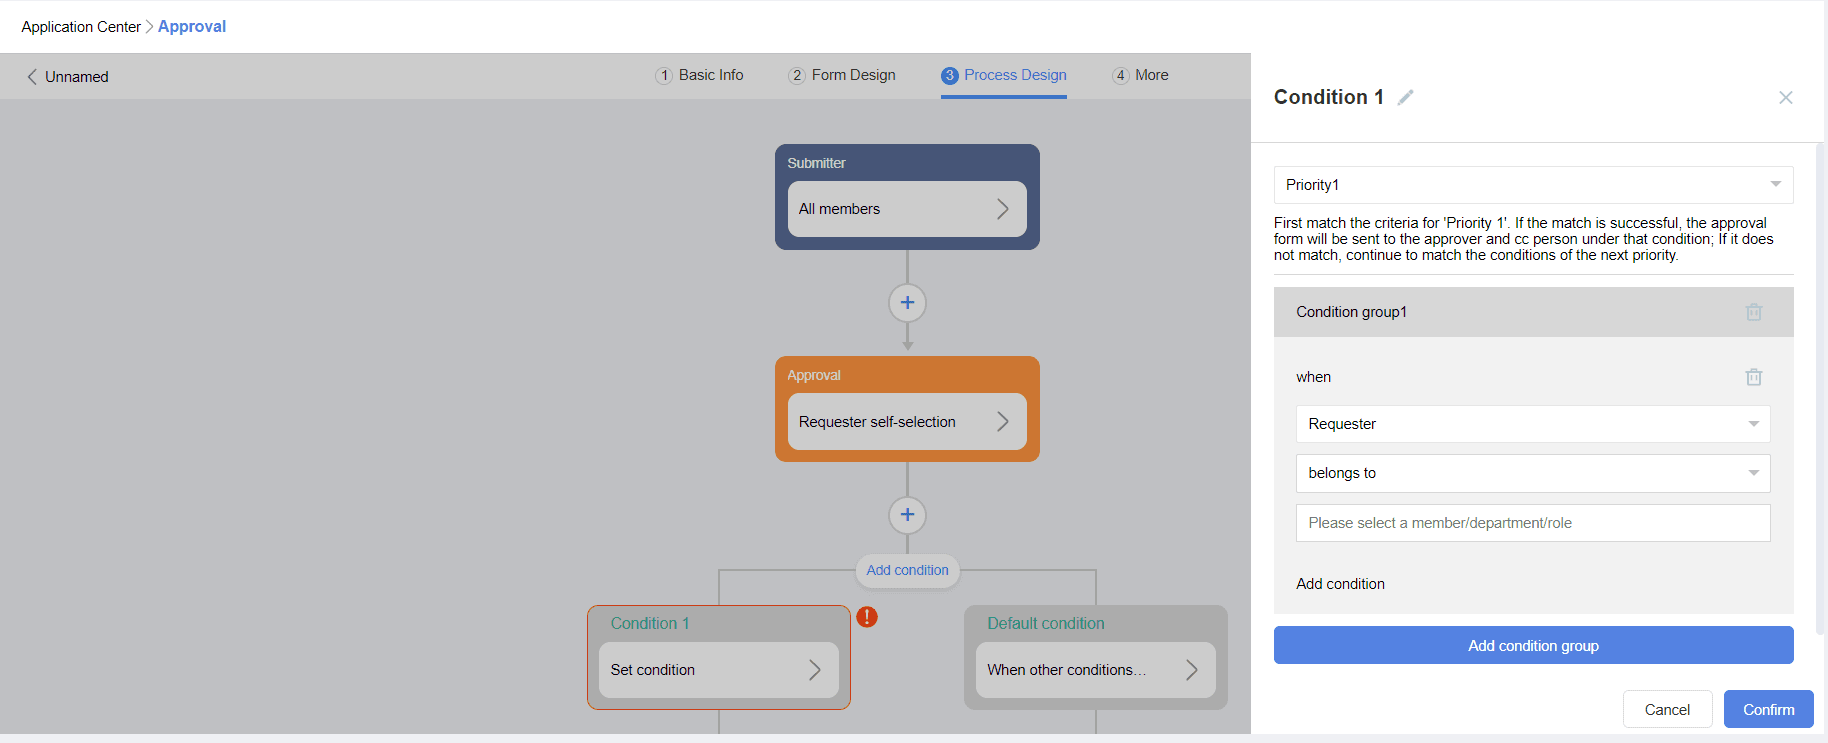
Priority: When multiple condition branches exist for the same process node, you can set condition priorities, and condition nodes will be evaluated in order of priority.
Condition Settings: Default condition is 【Initiator】; if controls such as numbers, radio buttons, checkboxes, date ranges, amounts, calculation formulas, departments, addresses, leave, overtime, outing, and business trip controls are added in 【Form Design】, corresponding condition options will also be added.
Approval Node
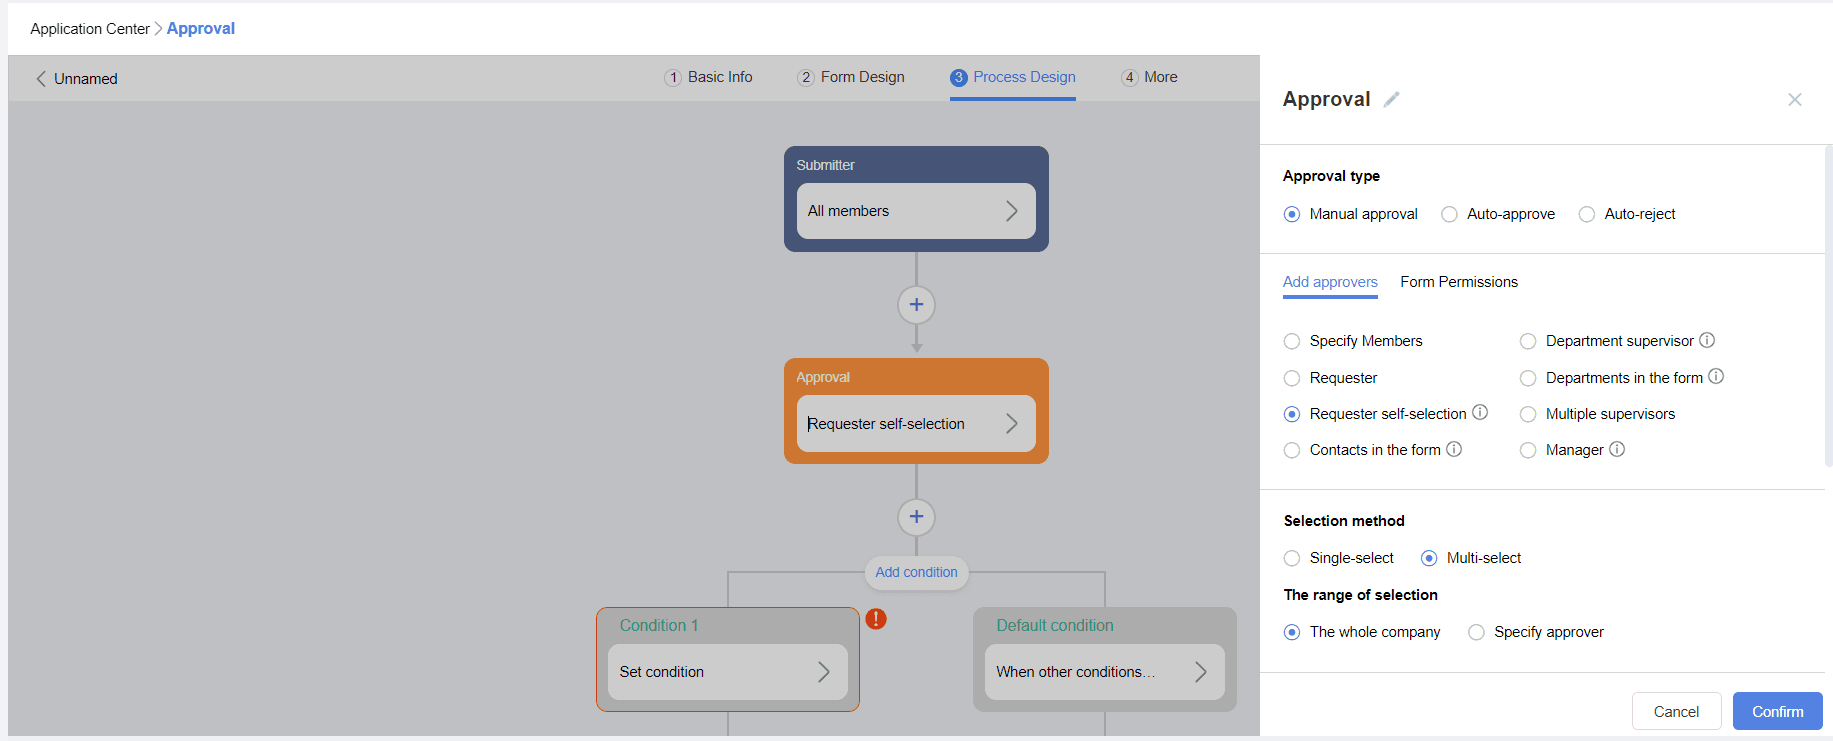
- Approval Type: Default is Manual Approval (requires setting approvers, form operation permissions), Auto-Approve (approval automatically passes when reaching this node), Auto-Reject (approval automatically rejects when reaching this node).
- Specify Members: Need to add members, up to 20 allowed.
- Department Head: Default is the initiator's direct department head, up to 20 levels of department heads can be set.
- Initiator Self: The user approves their own request; can be adjusted to automatically skip, or transfer to direct supervisor, or transfer to department head.
- Department Control within Form: If a department control is added in form design, the department head added in the control can be selected as the approver when submitting the approval, or up to 20 levels of department heads can be set.
- Initiator's Choice: Can be set for the initiator to choose one or multiple individuals, with a selection range of the entire company or specific members.Consecutive Multiple Direct Supervisors: Default sets the highest superior, customizable levels, up to minus 20 levels.
- Contact within Form: If a contact control is added in form design, the contact added in the control can be selected as the approver when creating the approval.
- Supervisor: Can set the initiator's supervisor as the approval responsible person, up to 20 levels of responsible persons can be set.
- Form Permissions: Automatically acquires added forms; can set editable, read-only, and hidden permissions for form controls for approvers.
CC Node
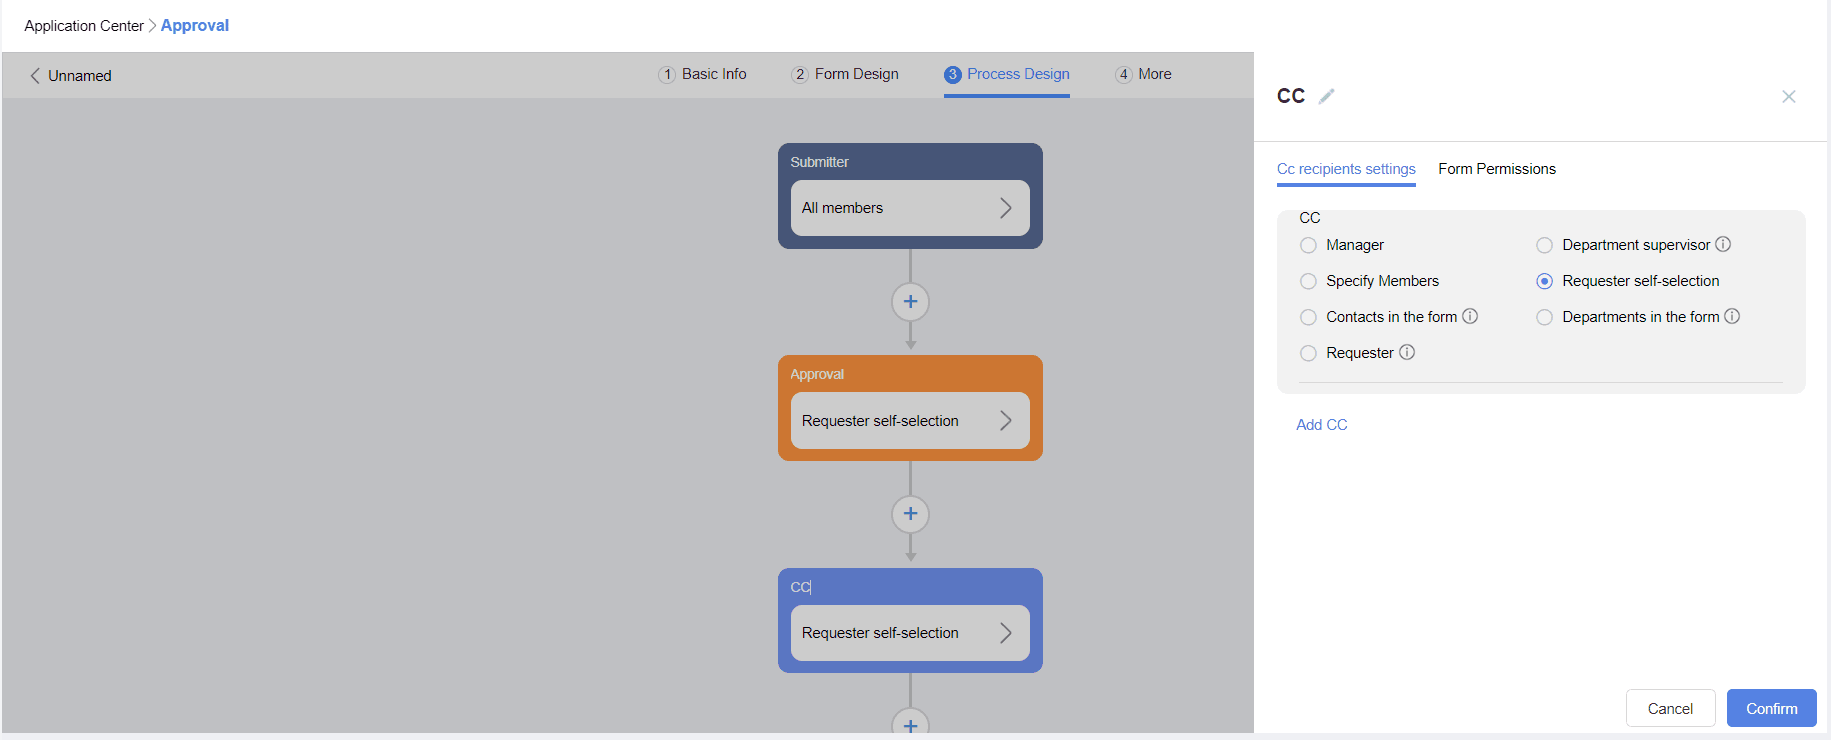
- Supervisor: Can set the initiator's supervisor as the CC person, up to 20 levels of responsible persons can be set.
- Department Head: Default is the initiator's direct department head, up to 20 levels of department heads can be set.
- Specify Members: Need to add members, up to 20 allowed.
- Initiator's Choice: Can be set for the initiator to choose, multi-selection supported by default.
- Contact within Form: If a contact control is added in form design, the contact added in the control can be selected as the CC person when creating the approval, up to 20 levels allowed.
- Department within Form: If a department control is added in form design, the department head added in the control can be selected as the CC person when creating the approval, up to 20 levels allowed.
- Initiator Self: Can be set to CC the initiator themselves.
- Form Permissions: Automatically acquires added forms; can set read-only and hidden permissions for form controls for CC persons.
Processing Node
- Supervisor: Can set the initiator's supervisor as the processor, up to 20 levels of responsible persons can be set.
- Department Head: Default is the initiator's direct department head, up to 20 levels of department heads can be set.
- Specify Members: Need to add members, up to 20 allowed.
- Initiator's Choice: Can be set for the initiator to choose, default is single-selection; selection range can also be set.
- Contact within Form: If a contact control is added in form design, the contact added in the control can be selected as the processor when creating the approval, up to 20 levels allowed.
- Department within Form: If a department control is added in form design, the department head added in the control can be selected as the processor when creating the approval, up to 20 levels allowed.
- Initiator Self: Can be set for the initiator to be the processor.
- Form Permissions: Automatically acquires added forms; can set editable, read-only, and hidden permissions for form controls for processors.
1.4 More Settings
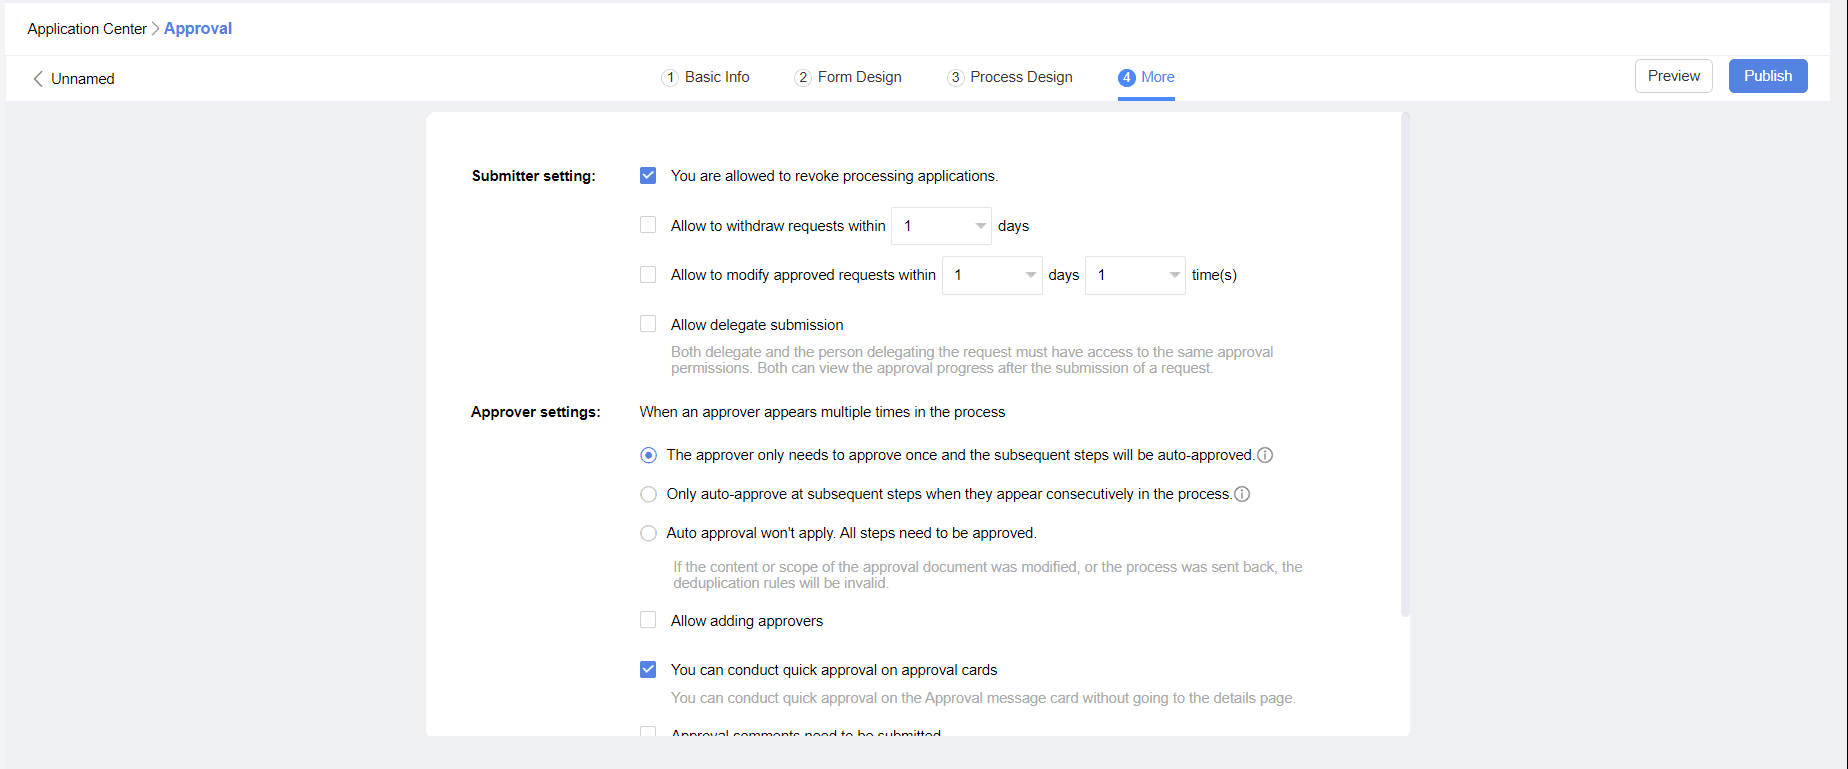
Submitter Settings
- Allow withdrawal of pending approval requests: If selected, allows direct withdrawal of submitted approval forms that are in the approval process.
- Allow withdrawal of approved requests within X days: If selected, approved requests within X days can be directly requested for withdrawal; after the specified time limit, withdrawal cannot be initiated.
- Allow modification of approved
Approval Settings
Repetition of the Same Approver in the Process:
- If selected: Approve Only Once, Subsequent Repeated Approval Nodes Automatically Approve: If the same person appears multiple times throughout the approval process, they only need to approve once, and subsequent nodes are automatically approved.
- If selected: Automatically Approve Only for Consecutive Nodes: If consecutive approval nodes are assigned to the same person, they only need to approve once, and subsequent consecutive nodes are automatically approved. Non-consecutive nodes require separate approval.
- If selected: Each Node Requires Approval: If multiple nodes in the approval process are assigned to the same person, each node must be approved separately.
Allow Additional Approvers: When checked, the approver can add other approvers at the approval node.
Quick Approval on Approval Card: When checked, quick approval can be performed directly in the approval assistant or approval list. If unchecked, approval can only be performed in the approval details.
Approval Comments Required: When checked, approval comments must be provided at the approval node, whether approving or rejecting. Comments are also required when agreeing at a processing node.
Forwarding Settings
Forward Only to Approval-Related Personnel: When checked, the approval form can only be forwarded to the submitter, approvers, CC recipients, and handlers. It cannot be forwarded to others. If unchecked, it can be forwarded to people in the address book.
2. Initiate Approval
[App Center] - [Approval] - [Initiate Request] - [Select Created Approval Form]
2.1 Form Content
- Submit on Behalf of: If the administrator has enabled [Allow Submission on Behalf of Others], the actual submitter control will be displayed; click to select the actual submitting user.
- Department: If the current submitter or actual submitter belongs to multiple departments, select the specific department.
- Contact Control: If the selected contact belongs to multiple departments, the contact's department must be selected.
- Detail Table: Click to add additional content under the detail table.
- Receipt Account: Added account information is only visible to the individual; others cannot edit the submitter's account information.
- Attachments: By default, up to 9 attachments are supported, with a maximum of 50MB per attachment.
2.2 Approval Process
After filling in the required form controls, the corresponding approval process will be automatically displayed.
Upon submission, messages will be sent to approvers, CC recipients, and handlers according to the approval process.
3. Process Approval
[Messages] - [Approval Assistant] or [Workbench] - [Approval] - [Approval Center]
Click on the approval to view details and perform actions such as editing, approving, rejecting, modifying, adding additional approvers, withdrawing, or forwarding.
Edit: Click to edit the content of the approval form.
- Approve: Approve the approval. If using a control group for approval, the corresponding business information will be modified upon approval.
- Reject: Reject the approval.
- Add Additional Approvers: Additional approvers can be added before or after the current node (if the current node involves multiple people, adding after is not allowed; if adding after a single person, the current node is considered approved by default).
- Recall: If the approval is in progress, the form can be directly withdrawn, and subsequent process node responsible persons will not receive approval information. If the form is completed, withdrawing will automatically initiate a withdrawal approval, and if successful, will restore the approval information to its original state.
- Modify: Automatically initiates a modification of the form. Upon approval, the original form data will be withdrawn and replaced with the new form data.
- Share: Click to directly forward this approval form to other users.
Path: Admin accesses 【Backend】 - 【Workbench】 - 【Approval】 - 【Form Management】 - 【Create New Form】 to directly create a blank form.